I Did Not Know I Could Do That With A Weber Kettle Part Two
- Richard Reynolds Jr.
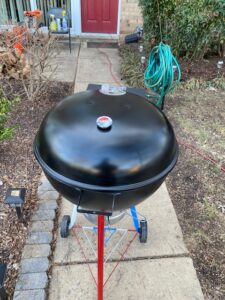
My Kettle Arsenal:
Embarking on a culinary journey with Weber Kettles has been my passion for nearly five years, and my kitchen arsenal proudly boasts four of these iconic grills. Picture this: three sleek 22-inch Kettles and a commanding 27-inch companion. Yet, the excitement doesn’t stop there; I’m eagerly anticipating the addition of a colossal 37-inch Weber Ranch Kettle to elevate my smoking and cooking adventures. If you haven’t laid eyes on the impressive Weber Ranch Kettle, I urge you to do so-the possibilities it unveils are truly boundless, my friends.
My Research:
Navigating the vast realm of internet wisdom on the Low and Slow cooking method was an eye-opener. Delving into the depths of YouTube and conducting thorough Google searches formed the backbone of my research. While the wealth of information proved enlightening, I found myself occasionally overwhelmed by the sheer volume of insights. My primary quest began with unraveling the mysteries of Indirect versus Direct cooking, sparking subsequent inquiries into the age-old debate of whether to wrap or not. The intricacies of using binders, the significance of dry rubs—these intriguing topics are poised to become focal points in future blog posts, each holding its own key to mastering the art of Low and Slow.
The Hinged Lid:
Taking a momentary pause, I found myself revisiting my blog post titled “I Did Not Know I Could Do That On A Weber Kettle.” Should you be intrigued to explore Part One of this revelation, it resides on my website at fireinthekettle.com. Reflecting on my journey, the overarching goal was to enhance my Weber Kettle, striving for accessories comparable to those adorning my friend’s Green Egg. Part One of the blog highlighted a particular convenience gap – the hinged lid on the Egg versus the non-hinged lid on my Kettle, a distinction that spurred my quest for an innovative solution.
My First Kettle Modification:
My mission centered on ingeniously hinging the lid of my Weber Kettle to its body. Now, you might be pondering the significance of this modification. Let me elucidate. While the Kettle’s porcelain enamel coating is undeniably robust, placing the lid on abrasive surfaces like concrete or, in my case, a brick patio, poses a potential risk of chipping the porcelain enamel coating. Throughout a cooking session, frequent checks on the protein being prepared demands numerous lid lifts. The solution became apparent—a hinged lid would eliminate the constant bending over, offering a significant enhancement. Not to be overlooked is the weight of Kettle lids, making the constant lifting and setting down a bit cumbersome. Moreover, the duration the lid remains off the grill impacts the time required for the Kettle to return to the desired smoking temperature—an aspect worth considering for a seamless cooking experience.
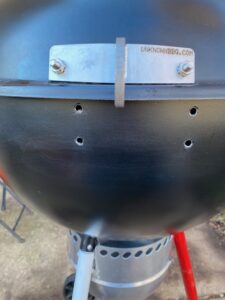
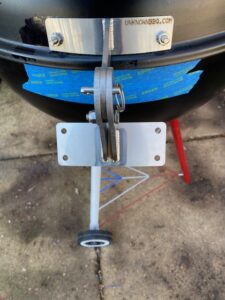
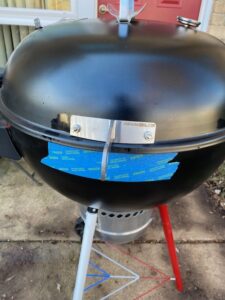
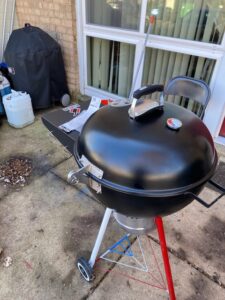
The Unknown BBQ hinge:
In my quest for an innovative solution, diligent research led me to unknownbbq.com, where I discovered a universal hinge designed for my 22-inch Weber Kettle. Take a moment to explore the visual journey captured in the pictures below. The transformative effect of attaching the hinge to both the lid and the body of the Kettle left me thoroughly impressed. So much so, that I promptly ordered three additional hinges for the rest of my Kettle collection, with the added excitement that this versatile hinge system seamlessly accommodates a 27-inch Kettle as well. A standout feature worth highlighting is the ingenious pin within the hinge’s design. This pin enables the complete removal of the Kettle lid by a simple extraction, a remarkably convenient feature facilitating easy cleaning of the lid’s interior – just pull the pin, and off comes the lid.
my first crucial point:
Before concluding this blog post, there are crucial points that demand attention. Firstly, the attachment of the hinge system to the Weber Kettle entails drilling holes into both the lid and the body of the Kettle. A pivotal consideration is the irreversible impact on the Kettle’s warranty once this modification is made. It is imperative to weigh this decision carefully. Secondly, a comprehensive list of necessary tools for the installation is essential, although the specifics won’t be covered in this blog post. For your convenience, a link on the homepage of my website, fireinthekettle.com, will direct you to the detailed tool requirements for this project.
My Second crucial point:
Before concluding this blog post, there are crucial points that demand attention. Firstly, the attachment of the hinge system to the Weber Kettle entails drilling holes into both the lid and the body of the Kettle. A pivotal consideration is the irreversible impact on the Kettle’s warranty once this modification is made. It is imperative to weigh this decision carefully. Secondly, a comprehensive list of necessary tools for the installation is essential, although the specifics won’t be covered in this blog post. For your convenience, a link on the homepage of my website, fireinthekettle.com, will direct you to the detailed tool requirements for this project.
My third and Final Crucial Point:
The third crucial aspect necessitates unwavering attention—once the hinge system finds its place, there’s no turning back. Precision in installation is paramount, for any misstep means commitment to the outcome. It’s imperative to diligently peruse the provided instructions, ensuring a flawless execution. Reflecting on my early days of culinary experimentation with the Weber Kettle, I vividly recall an oversight—placing the top damper directly over the fuel source resulted in a perplexing inability to sustain the burn. The key revelation: mastering the art of cooking/smoking on a Weber Kettle hinges on airflow dynamics. When installing the hinge system, remember this vital lesson—the top damper must reside on the opposite side of the fuel source to maintain the burn. Additionally, if the prospect of wielding power tools feels daunting, exploring alternative installation methods is advisable. For those embarking on the unknownbbq hinge system journey, may the experience bring you as much joy as it has brought me.
In Closing:
Given the available space in this blog post, I’m eager to highlight another noteworthy distinction I observed between my friend’s Green Egg and my Weber Kettle. While the Green Egg’s lid snugly sealed to the body, ensuring that every wisp of smoke gracefully exited through the top vent, my Weber Kettle, though tight, allowed a subtle escape of smoke through the lid. I delved into this disparity in my previous blog post, “I Did Not Know I Could Do That With A Weber Kettle” Part One, accessible on fireinthekettle.com. Recognizing that a fitting gasket could resolve this issue, I scoured the internet and discovered Island Outdoor LLC. There, I stumbled upon a LavaLock gasket, generously sized at several feet in length, half an inch wide, and with an eighth-inch thickness. You can find this gasket at bbqgaskets.com, and the company itself is at islandoutdoorllc.com. With the gasket seamlessly installed, my predicament vanished, confining the smoke within the Kettle, and directing it solely through the top damper. A delightful surprise from Island Outdoor LLC was a complimentary one-hundred-dollar wine voucher accompanying the gasket.