I Did Not Know I Could Do That On A Weber Kettle Part Three
- Richard Reynolds Jr.
The Purpose of the Post:
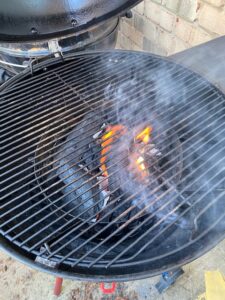
In this blog post, I aim to elucidate the Direct cooking method for preparing meat on a Weber Kettle. The Indirect smoking method on Weber Kettles will be explored in a separate blog post. It’s crucial to distinguish that when discussing the Direct cooking of meats on a Weber Kettle, we are not referring to smoking the same type of meat. Direct cooking involves igniting charcoal using a chimney starter and placing it on the Weber Kettle’s charcoal grate. Various all-natural options, including fire starters and wax, can be used in the chimney starter, which takes away the need for charcoal lighter fluid. See pictures below for demonstrations.


Direct Cooking Is Hot and Requires Tools:
But, before diving into a Direct cook on a Weber Kettle, it’s essential to pause and consider a few things. Firstly, Direct cooking generates high heat. Therefore, understanding the tools required for a Direct cook is paramount. While I won’t delve into the detailed list of tools in this blog post, you can find the comprehensive information on the required tools for Direct cooking on a Weber Kettle on my website’s Home Page at fireinthekettle.com. The provided link will display the necessary tools for utilizing the Direct cooking method, along with an explanation of their importance.
Direct Cooking Explained:
Direct cooking involves placing the hot, glowing coals from the chimney starter onto the charcoal grate at the bottom of the Weber Kettle. After putting the cooking grate in position, the meat is then directly positioned over the red-hot coals. This cooking method yields food with a crispy, charred exterior and a moist, juicy interior. It is particularly well-suited for steaks, sausages, burgers, and hotdogs. The Direct cooking process is swift, aiming to reach the correct internal temperature for the meat without burning it.
How Does air affect a fire in a kettle:
It’s important to note that the intensity of the fire and flame in a Kettle grill using charcoal is influenced by the amount of air applied. Cooking without the Kettle lid and the bottom damper opened to half to three-quarters results in a higher flame, increasing the risk of burning unless the meat is consistently flipped. If the lid is utilized in a Direct cook, adjusting the top damper to open, or closed can control the flame, providing more heat with less visible flame. However, it’s crucial to flip the meat several times during the cook. Keep in mind that flare-ups or sudden increases in flame are common with the Direct cooking method and should be avoided. These occurrences typically happen when fat from the meat drips onto the hot charcoal. If a flare-up occurs, close the lid promptly to mitigate the situation.

The Two-Zone Direct Cooking Method:
In my approach to Direct cooking, I implement a Two-Zone Grilling Method on my Weber Kettle, creating a Cold Side and a Hot Side. This method strikes a balance between the Direct and Indirect cooking methods. On one side of the Weber Kettle, we have the Direct heat side (where the fire is), while the other side is the cold side, allowing the meat to cook without the risk of burning. I’ll delve into the Sear versus Reverse Sear method in a future blog post.
What to Expect from your kettle:
To visualize, let’s consider a 22-inch Premium Kettle, providing a cooking grate area of 22 inches at the top. However, due to the bulbous shape of the Weber Kettle body, the lower down the Kettle, the less space is available for setting up the cold side. Regardless of charcoal type—briquet or lump—it occupies space on the charcoal grate at the bottom of the Weber Kettle. Assuming the charcoal grate is approximately 11 inches in diameter, it’s crucial to understand that for every inch of charcoal grate used, you lose an inch of cold side cooking grate. For instance, using six inches of the charcoal grate means losing approximately six inches of cold side cooking grate.
Stacking Coals Can Be A Plus:
This is where the stacking of coals becomes significant, and having a second pair of tongs dedicated to moving hot coals proves handy. In pursuit of more heat with the Direct cooking method, I adjust my bottom damper to half to three-quarters open, fully open the top damper, and utilize the lid to control the fire or flame in the pit.
Two Approaches to the Two-Zone Direct Cooking Method:
I would like to highlight that there are now two approaches to implementing the Two-Zone cooking method. The first method involves placing as much meat as possible directly over the red-hot coals. If there’s additional meat that can’t fit over the red-hot coals, it’s placed on the cool side. This process requires keeping the lid open or completely off the body of the Kettle. Here, the hinge system for a Weber Kettle, which I discuss in detail in my blog post titled “I Did Not Know I Could Do That With A Weber Kettle” Part Two, becomes particularly useful. You can find the blog post on my website at fireinthekettle.com.
In Closing:
Hopefully this post gave some clearer understanding to the Direct Cooking Method on a Weber Kettle. Due to the fact that this post became longer than I originally intended, my plan is to do a Direct Cooking Method Part II next week. If you have any comments please feel free to submit them below. If you would like to visit our web site we are at fireinthekettle.com